Friday, March 23, 2012

Dapper Man Mixed Medium Collage (Work In Progress)

Here we go again with another great challenge over at Simon Says Stamp and Show! This weeks challenge? Show your handmade backgrounds! As soon as I saw it I knew I wanted to share this piece which is a work-in-progress. I didn't really take note of the exact products and tools I was using, but I can give a general idea...

It's hard to tell from the photo, but this is actually done on watercolor paper that is 9"x 12". Did I use watercolors? Not a drop, but I really wanted to work with the texture of the paper.


You may recognize this dapper gentleman from the Steampunk Art stamp set by Wendy Vecchi... only he's bigger! To scale this image to the size of my paper I simply stamped the image on regular paper then scanned it into my computer, resized it in photoshop and printed it out. Voila! I first used vintage photo distress ink on him then I went over all the black parts of the image with a black oil pastel.
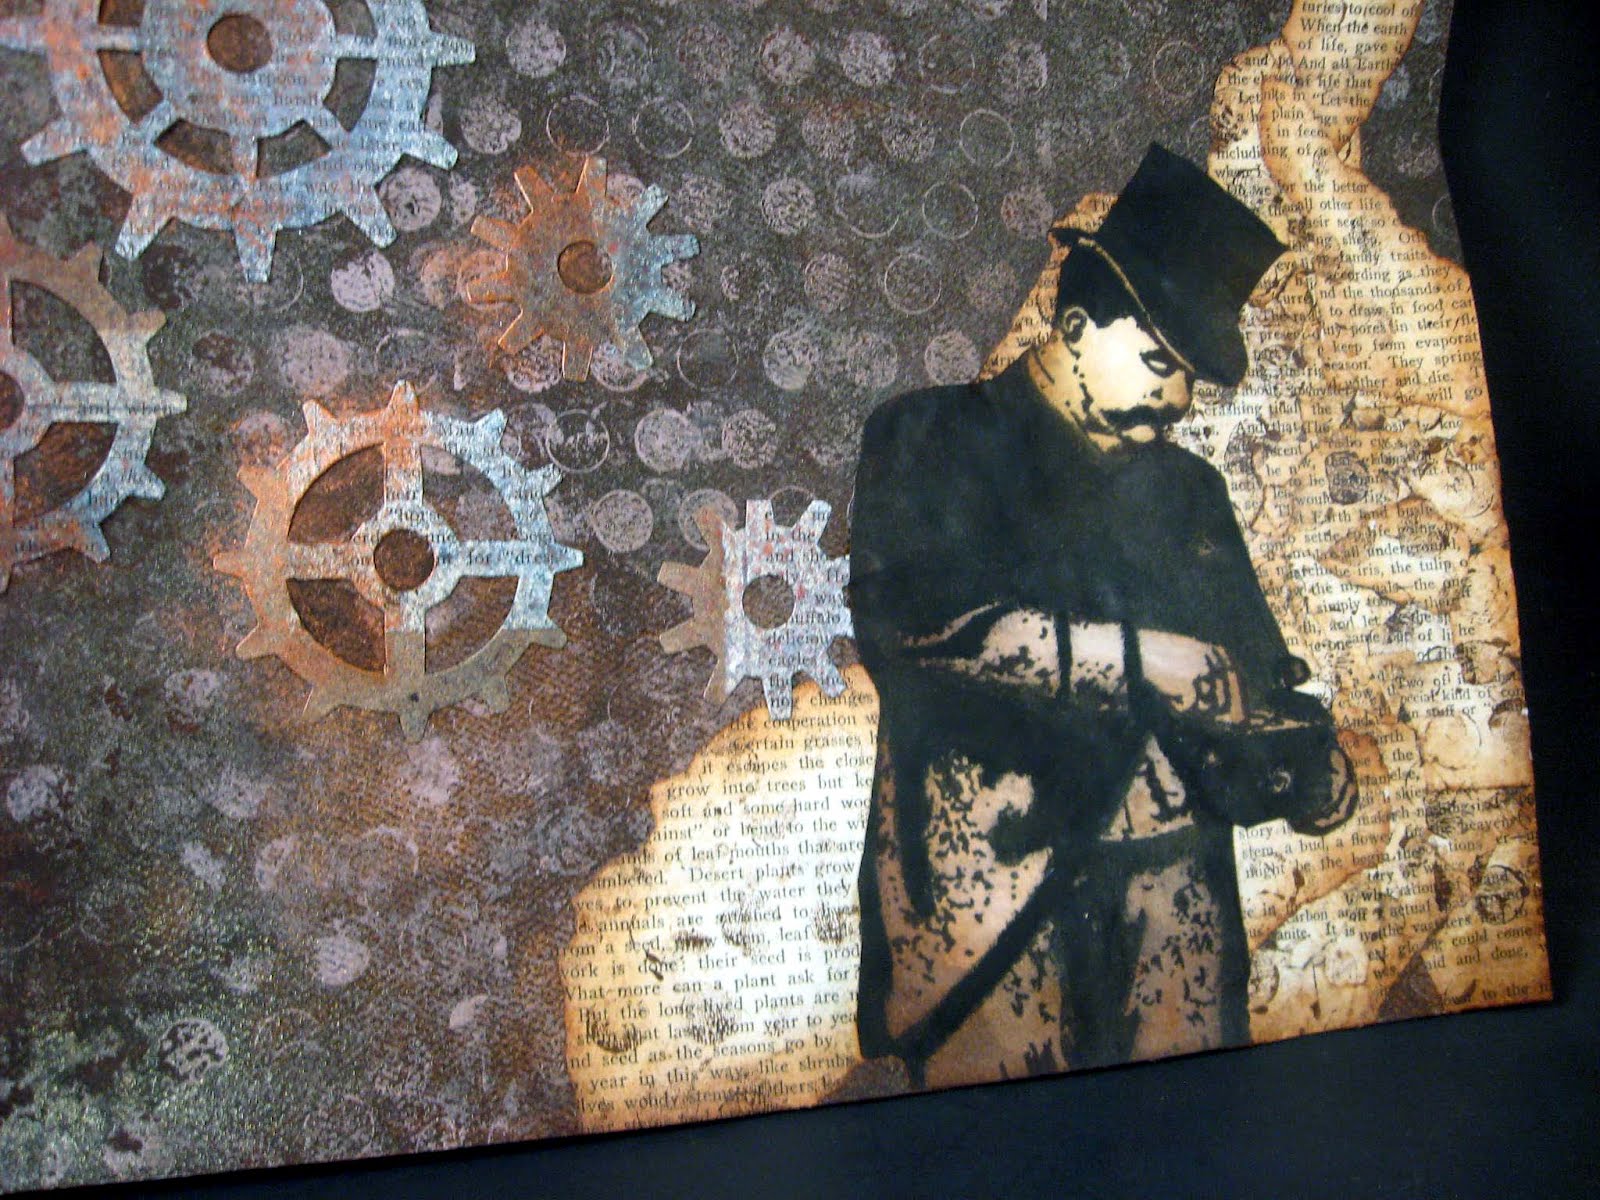
One of my favorite things to work with are real vintage book pages. Something about them just inspires me. Of course I am very picky about what books I will actually use for crafting as I am quite fond of old books and very sentimental like that. For the bottom right corner, extending in a tapered manner to the top right, I added torn pages that were distressed with vintage photo ink.
You can also see the addition of small bits of pages in the top left corner. I felt this helped create a cohesive look to the project. For the first layers of background I used various acrylic paints. I also used a dot background stamp from Hero Arts with acrylic paint to add- well... the dots. I used a lighter brown over the dark paint and a darker brown in areas where the book pages are.
The gears were created by layering book pages over Kraft paper and die cutting them using the Tim Holtz/Sizzix Gadget Gears die. I then stippled over them with metallic acrylics. I really wanted to create a sort of rusty look to them so I used copper metallic paint to enhance them.
Like I mentioned- this is a work in progress and I am definitely not finished. It's one of those projects I will probably work on randomly when the inspiration hits until eventually, one day, I just know that it's done.
As always
Angela

Saturday, March 17, 2012

Altered Rolodex Holder: Before and After

If you happened to check out my Altered Rolodex Holder post yesterday, you know I mentioned it started out in a sad state. I wanted to share the before and after's with you today and a little about my process to repair some of the damage. (If you want to know exact details on getting to the finished product and everything I used, please view yesterday's post).

Here you can see the front of the lid has a crack going down the angled part and a chip missing from the front lip. Looking at it now, I suppose it wasn't really all that bad considering how old it must be, but still... it was begging for me to alter it!


The most important thing to me to begin with was fixing the area where there was an actual piece missing. I decided to use cardstock to bridge over the empty space. I placed the cardstock on both the top and bottom...

Next, I wanted to make sure it was as stable as possible so that it would be a surface I could work over without worrying about anything so I used athlete's tape (gone over in vintage photo distress ink) to cover the entire lip. I knew the decoupaging I did with book pages and mod podge would take care of the crack so I didn't do anything to prep that.
And here you can see where the gash used to be- you can't even tell!
And just one last look at the final outcome...

Thanks for stopping by! I hope you'll be inspired to look at things a little differently and maybe fix up something of your own!
As always
Angela

Friday, March 16, 2012

Altered Rolodex Holder

Another lovely challenge this week over at Simon Says Stamp and Show! Why? Because this weeks challenge is "Anything Goes" which was the perfect opportunity for me to work on something I needed and wanted to work on. I recently decided to give altered rolodex cards a try. My wonderful mommy happened to have an old rolodex holder she was no longer using so she said I could have it as storage for any cards I make or collect! It was in quite a sad state (I'll post later on that), but I thought it would be perfect for altering!

Here you can see an over-all shot of the finished rolo holder... The first step in my process was to tear up pages from a real vintage book, distress all the edges, then mod-podge them over the entire cover. After everything had dried I used various stamps from the Tim Holtz/ Stampers Anonymous Papillon Stamp set to add the French vintage lettering and butterfly images.


I used a few different items from Tim's idea-ology line to embellish the lid, including these great Hardware Corners and a keyhole from Tim's Locket Keys.

Another idea-ology embellishment... this fabulous Ornate Plate. The inner part was created by stamping in Archival ink, distressing in vintage photo distress ink and going over it with Crackle Accents.

This project took me all week because I kept running into "creative issues", but I'm really pleased with the finished product. Hope you've enjoyed taking a peek! I can't wait to start filling it with little works of art...
As always
Angela

Tuesday, March 6, 2012

Steampunk Bottle

I must say I am so happy I was referred to the Simon Says Stamp and Show challenge blog by a swapping friend of mine (thanks, Rhea)! It's always great to have something that gets the creative juices flowing in possibly unexpected ways. Take this weeks challenge for example- "Bottle It"! As soon as I read the challenge I knew what I wanted to do. As I started working things weren't turning out exactly as I had envisioned... they were turning out better! I also ended up using a completely different stamped image than I originally thought I would. It all ended up turning into something I was much more pleased with than my original concept- happy accident!

I am also adding this project to another challenge blog that I accidentally discovered by looking through other blog challenge submissions... La-De-Dah: My Mojo Monthly (March). As I mention a bit further down, the inspiration for this bottle was the amber colored vials and bottles that were so popular in a time long gone. My fascination with antique and vintage bottles started as a child during visits to my Grandparent's home in the country. There was a tiny closet in the back of an upstairs room with shelves full of found vials and bottles- dug up from the dirt around their farm or in near-by fields. I took one to keep as my own and still have it today. I actually use it these days as a prop when photographing most of my vintage inspired art and I still receive a happy thrill every time I look at it. (My grandmother passed away this past October and I was able to bring home some of her antique books and vintage aprons. This bottle I have is just another reminder of my times with her).

You can see in this photo my completed project...


Here is a shot of what the original bottle looked like compared to the finished project. I dripped various colors of alcohol ink into the bottle and just slowly moved it all around until the bottle was completely color coated and dry. I really wanted to get the look of the amber colored vials and bottles that were so popular in that era.
I added various Sprocket Gears from the Tim Holtz idea-ology line to the top. I had a mini battle with my E-6000 at this point, but I won in the end. I also gave the lid a faux patina using various alcohol inks (Ranger).
I wanted something industrial, but simple... lots of great metal embellishments to adorn the neck of the bottle with. I went with two of Tim's Swivel Clasps joined together to go around the neck. I then took a third swivel clasp, added a carefully selected Trinket Pin (it's the one that says Ideas... I thought it was perfect for a Steampunk project) and draped this combination off the original clasps. From this I added another sprocket gear with a small Idea-ology jump ring.
Now for what may be my favorite part... My dapper men! This is probably my most loved and most used of all my stamps. You can find these gentlemen with the Steampunk Set from Tim Holtz and Stampers Anonymous. For this part I stamped and fussy cut the men and added a band of matching cardstock from one side to the other. I also used my paper distresser from Tonic and added Vintage Photo distress ink.
The wonderful thing about this project is it reminded me that I have a small stash of these bottles I have been keeping for almost two years to alter at some point. I had honestly forgot all about them until this challenge! I hope you will be inspired to dig out something you may have forgotten about and get creating!
As always
Angela

Sunday, March 4, 2012

Vintage Treasures Box

As some of you may have seen- last week I entered the Simon Says Stamp and Show blog challenge for the first time. I enjoyed it so much I couldn't resist checking out their challenge for this week... Simon Says Stamp and Show- An Idea-Ology Bonanza! When it comes to Tim Holtz products, I am a huge fan of the Idea-ology line. I know a huge part of this line are all the fantastic little trinkets and embellishments (which I use quite often), but his paper is also part of this line. And if you know me, you know I LURVE paper!

For this project I used the Retro Grunge Paper Stash and wanted to try my hand at a little bit of paper sculpting which isn't something I normally do. I used my Tattered Floral die for the flower and my Hanging Sign die for the flourishes coming out from beneath the flower.

For the bookplate I used the Tag and Bookplates die with an aluminum soda can then used various alcohol inks to coordinate it with my paper. The vintage word stamp is from the Wendy Vecchi Collectible Art stamp set.
The entire piece was accented with Vintage Photo Distress Ink- the edges of the box and also the edges of the flower.
A few close-ups of the flower...
I wanted the back petals to curve down to hug the side and corner of the box.
So there it is... my vintage treasures box inspired by this weeks Simon Says Stamp and Show blog challenge!
As always
Angela