At one point in time this blog was a huge part of my weekly routine... I loved creating and sharing those creations with the world (whether the world was taking a look or not... which was mostly not). And then? Well, life happened. Not the good kind of life where you're just so busy with all the amazing things going on that you can't possibly squeeze in a five minute post about whatever your latest creation is. No, it was the kind of life that just takes you out of the game for awhile... the kind that robs you of all your passions and steals away any inspiration from your world.
But hey, it happens. And then? And then life goes on. At first it's just figuring out a way to cope and get through every day. After awhile though, if you allow healing to take place and actively participate in moving on, you realize you're not just coping and getting by anymore. You realize you're actually living again... you realize you're smiling and laughing and really, truly living again. And that's where I am now. Like, all of a sudden, without putting too much thought into it, life has somehow returned to me. And with it, inspiration! And with inspiration, the urge to create!
So now what? Well, now life continues to go on. And maybe I will start to create again. And if I do create, maybe I will find five minutes to share it with the world again (whether the world is looking or not)...
As always (yes, ALWAYS)
Angela
Sunday, September 13, 2015
Friday, March 23, 2012
Dapper Man Mixed Medium Collage (Work In Progress)
Here we go again with another great challenge over at Simon Says Stamp and Show! This weeks challenge? Show your handmade backgrounds! As soon as I saw it I knew I wanted to share this piece which is a work-in-progress. I didn't really take note of the exact products and tools I was using, but I can give a general idea...
It's hard to tell from the photo, but this is actually done on watercolor paper that is 9"x 12". Did I use watercolors? Not a drop, but I really wanted to work with the texture of the paper.
 You may recognize this dapper gentleman from the Steampunk Art stamp set by Wendy Vecchi... only he's bigger! To scale this image to the size of my paper I simply stamped the image on regular paper then scanned it into my computer, resized it in photoshop and printed it out. Voila! I first used vintage photo distress ink on him then I went over all the black parts of the image with a black oil pastel.
 One of my favorite things to work with are real vintage book pages. Something about them just inspires me. Of course I am very picky about what books I will actually use for crafting as I am quite fond of old books and very sentimental like that. For the bottom right corner, extending in a tapered manner to the top right, I added torn pages that were distressed with vintage photo ink.
 You can also see the addition of small bits of pages in the top left corner. I felt this helped create a cohesive look to the project. For the first layers of background I used various acrylic paints. I also used a dot background stamp from Hero Arts with acrylic paint to add- well... the dots. I used a lighter brown over the dark paint and a darker brown in areas where the book pages are.
 The gears were created by layering book pages over Kraft paper and die cutting them using the Tim Holtz/Sizzix Gadget Gears die. I then stippled over them with metallic acrylics. I really wanted to create a sort of rusty look to them so I used copper metallic paint to enhance them.
 Like I mentioned- this is a work in progress and I am definitely not finished. It's one of those projects I will probably work on randomly when the inspiration hits until eventually, one day, I just know that it's done.
It's hard to tell from the photo, but this is actually done on watercolor paper that is 9"x 12". Did I use watercolors? Not a drop, but I really wanted to work with the texture of the paper.
 You may recognize this dapper gentleman from the Steampunk Art stamp set by Wendy Vecchi... only he's bigger! To scale this image to the size of my paper I simply stamped the image on regular paper then scanned it into my computer, resized it in photoshop and printed it out. Voila! I first used vintage photo distress ink on him then I went over all the black parts of the image with a black oil pastel.
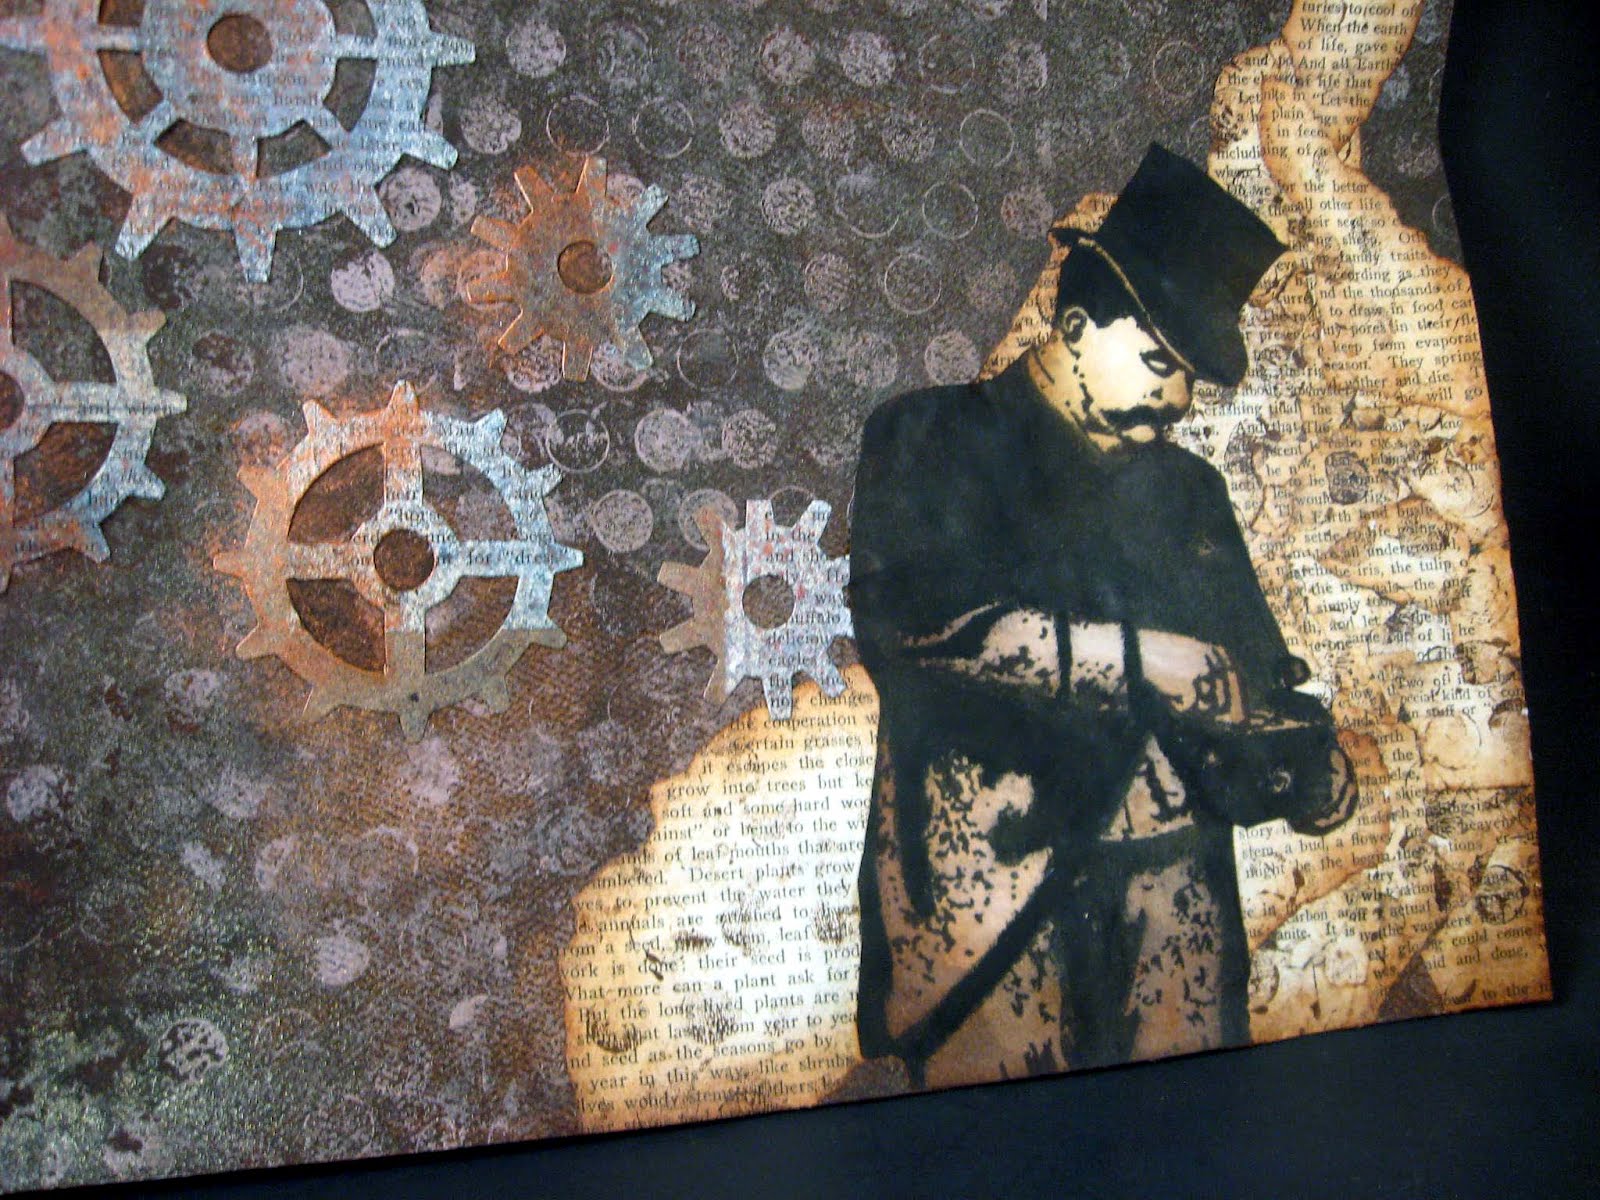 One of my favorite things to work with are real vintage book pages. Something about them just inspires me. Of course I am very picky about what books I will actually use for crafting as I am quite fond of old books and very sentimental like that. For the bottom right corner, extending in a tapered manner to the top right, I added torn pages that were distressed with vintage photo ink.
 You can also see the addition of small bits of pages in the top left corner. I felt this helped create a cohesive look to the project. For the first layers of background I used various acrylic paints. I also used a dot background stamp from Hero Arts with acrylic paint to add- well... the dots. I used a lighter brown over the dark paint and a darker brown in areas where the book pages are.
 The gears were created by layering book pages over Kraft paper and die cutting them using the Tim Holtz/Sizzix Gadget Gears die. I then stippled over them with metallic acrylics. I really wanted to create a sort of rusty look to them so I used copper metallic paint to enhance them.
 Like I mentioned- this is a work in progress and I am definitely not finished. It's one of those projects I will probably work on randomly when the inspiration hits until eventually, one day, I just know that it's done.
As always
Angela
Saturday, March 17, 2012
Altered Rolodex Holder: Before and After
If you happened to check out my Altered Rolodex Holder post yesterday, you know I mentioned it started out in a sad state. I wanted to share the before and after's with you today and a little about my process to repair some of the damage. (If you want to know exact details on getting to the finished product and everything I used, please view yesterday's post).
Here you can see the front of the lid has a crack going down the angled part and a chip missing from the front lip. Looking at it now, I suppose it wasn't really all that bad considering how old it must be, but still... it was begging for me to alter it!
 Next, I wanted to make sure it was as stable as possible so that it would be a surface I could work over without worrying about anything so I used athlete's tape (gone over in vintage photo distress ink) to cover the entire lip. I knew the decoupaging I did with book pages and mod podge would take care of the crack so I didn't do anything to prep that.
 And here you can see where the gash used to be- you can't even tell!
 And just one last look at the final outcome...

Here you can see the front of the lid has a crack going down the angled part and a chip missing from the front lip. Looking at it now, I suppose it wasn't really all that bad considering how old it must be, but still... it was begging for me to alter it!

The most important thing to me to begin with was fixing the area where there was an actual piece missing. I decided to use cardstock to bridge over the empty space. I placed the cardstock on both the top and bottom...
 Next, I wanted to make sure it was as stable as possible so that it would be a surface I could work over without worrying about anything so I used athlete's tape (gone over in vintage photo distress ink) to cover the entire lip. I knew the decoupaging I did with book pages and mod podge would take care of the crack so I didn't do anything to prep that.
 And here you can see where the gash used to be- you can't even tell!
 And just one last look at the final outcome...
Thanks for stopping by! I hope you'll be inspired to look at things a little differently and maybe fix up something of your own!
As always
Angela
Friday, March 16, 2012
Altered Rolodex Holder
Another lovely challenge this week over at Simon Says Stamp and Show! Why? Because this weeks challenge is "Anything Goes" which was the perfect opportunity for me to work on something I needed and wanted to work on. I recently decided to give altered rolodex cards a try. My wonderful mommy happened to have an old rolodex holder she was no longer using so she said I could have it as storage for any cards I make or collect! It was in quite a sad state (I'll post later on that), but I thought it would be perfect for altering!
Here you can see an over-all shot of the finished rolo holder... The first step in my process was to tear up pages from a real vintage book, distress all the edges, then mod-podge them over the entire cover. After everything had dried I used various stamps from the Tim Holtz/ Stampers Anonymous Papillon Stamp set to add the French vintage lettering and butterfly images.
 Another idea-ology embellishment... this fabulous Ornate Plate. The inner part was created by stamping in Archival ink, distressing in vintage photo distress ink and going over it with Crackle Accents.

 This project took me all week because I kept running into "creative issues", but I'm really pleased with the finished product. Hope you've enjoyed taking a peek! I can't wait to start filling it with little works of art...
Here you can see an over-all shot of the finished rolo holder... The first step in my process was to tear up pages from a real vintage book, distress all the edges, then mod-podge them over the entire cover. After everything had dried I used various stamps from the Tim Holtz/ Stampers Anonymous Papillon Stamp set to add the French vintage lettering and butterfly images.


I used a few different items from Tim's idea-ology line to embellish the lid, including these great Hardware Corners and a keyhole from Tim's Locket Keys.
 Another idea-ology embellishment... this fabulous Ornate Plate. The inner part was created by stamping in Archival ink, distressing in vintage photo distress ink and going over it with Crackle Accents.
 This project took me all week because I kept running into "creative issues", but I'm really pleased with the finished product. Hope you've enjoyed taking a peek! I can't wait to start filling it with little works of art...
As always
Angela
Tuesday, March 6, 2012
Steampunk Bottle
I must say I am so happy I was referred to the Simon Says Stamp and Show challenge blog by a swapping friend of mine (thanks, Rhea)! It's always great to have something that gets the creative juices flowing in possibly unexpected ways. Take this weeks challenge for example- "Bottle It"! As soon as I read the challenge I knew what I wanted to do. As I started working things weren't turning out exactly as I had envisioned... they were turning out better! I also ended up using a completely different stamped image than I originally thought I would. It all ended up turning into something I was much more pleased with than my original concept- happy accident!
I am also adding this project to another challenge blog that I accidentally discovered by looking through other blog challenge submissions... La-De-Dah: My Mojo Monthly (March). As I mention a bit further down, the inspiration for this bottle was the amber colored vials and bottles that were so popular in a time long gone. My fascination with antique and vintage bottles started as a child during visits to my Grandparent's home in the country. There was a tiny closet in the back of an upstairs room with shelves full of found vials and bottles- dug up from the dirt around their farm or in near-by fields. I took one to keep as my own and still have it today. I actually use it these days as a prop when photographing most of my vintage inspired art and I still receive a happy thrill every time I look at it. (My grandmother passed away this past October and I was able to bring home some of her antique books and vintage aprons. This bottle I have is just another reminder of my times with her).
You can see in this photo my completed project...
 Here is a shot of what the original bottle looked like compared to the finished project. I dripped various colors of alcohol ink into the bottle and just slowly moved it all around until the bottle was completely color coated and dry. I really wanted to get the look of the amber colored vials and bottles that were so popular in that era.
 I added various Sprocket Gears from the Tim Holtz idea-ology line to the top. I had a mini battle with my E-6000 at this point, but I won in the end. I also gave the lid a faux patina using various alcohol inks (Ranger).
 I wanted something industrial, but simple... lots of great metal embellishments to adorn the neck of the bottle with. I went with two of Tim's Swivel Clasps joined together to go around the neck. I then took a third swivel clasp, added a carefully selected Trinket Pin (it's the one that says Ideas... I thought it was perfect for a Steampunk project) and draped this combination off the original clasps. From this I added another sprocket gear with a small Idea-ology jump ring.
 Now for what may be my favorite part... My dapper men! This is probably my most loved and most used of all my stamps. You can find these gentlemen with the Steampunk Set from Tim Holtz and Stampers Anonymous. For this part I stamped and fussy cut the men and added a band of matching cardstock from one side to the other. I also used my paper distresser from Tonic and added Vintage Photo distress ink.
The wonderful thing about this project is it reminded me that I have a small stash of these bottles I have been keeping for almost two years to alter at some point. I had honestly forgot all about them until this challenge! I hope you will be inspired to dig out something you may have forgotten about and get creating!
As always
Angela
Sunday, March 4, 2012
Vintage Treasures Box
As some of you may have seen- last week I entered the Simon Says Stamp and Show blog challenge for the first time. I enjoyed it so much I couldn't resist checking out their challenge for this week... Simon Says Stamp and Show- An Idea-Ology Bonanza! When it comes to Tim Holtz products, I am a huge fan of the Idea-ology line. I know a huge part of this line are all the fantastic little trinkets and embellishments (which I use quite often), but his paper is also part of this line. And if you know me, you know I LURVE paper!
For this project I used the Retro Grunge Paper Stash and wanted to try my hand at a little bit of paper sculpting which isn't something I normally do. I used my Tattered Floral die for the flower and my Hanging Sign die for the flourishes coming out from beneath the flower.
 For the bookplate I used the Tag and Bookplates die with an aluminum soda can then used various alcohol inks to coordinate it with my paper. The vintage word stamp is from the Wendy Vecchi Collectible Art stamp set.
 The entire piece was accented with Vintage Photo Distress Ink- the edges of the box and also the edges of the flower.
 A few close-ups of the flower...
 I wanted the back petals to curve down to hug the side and corner of the box.

For this project I used the Retro Grunge Paper Stash and wanted to try my hand at a little bit of paper sculpting which isn't something I normally do. I used my Tattered Floral die for the flower and my Hanging Sign die for the flourishes coming out from beneath the flower.
 For the bookplate I used the Tag and Bookplates die with an aluminum soda can then used various alcohol inks to coordinate it with my paper. The vintage word stamp is from the Wendy Vecchi Collectible Art stamp set.
 The entire piece was accented with Vintage Photo Distress Ink- the edges of the box and also the edges of the flower.
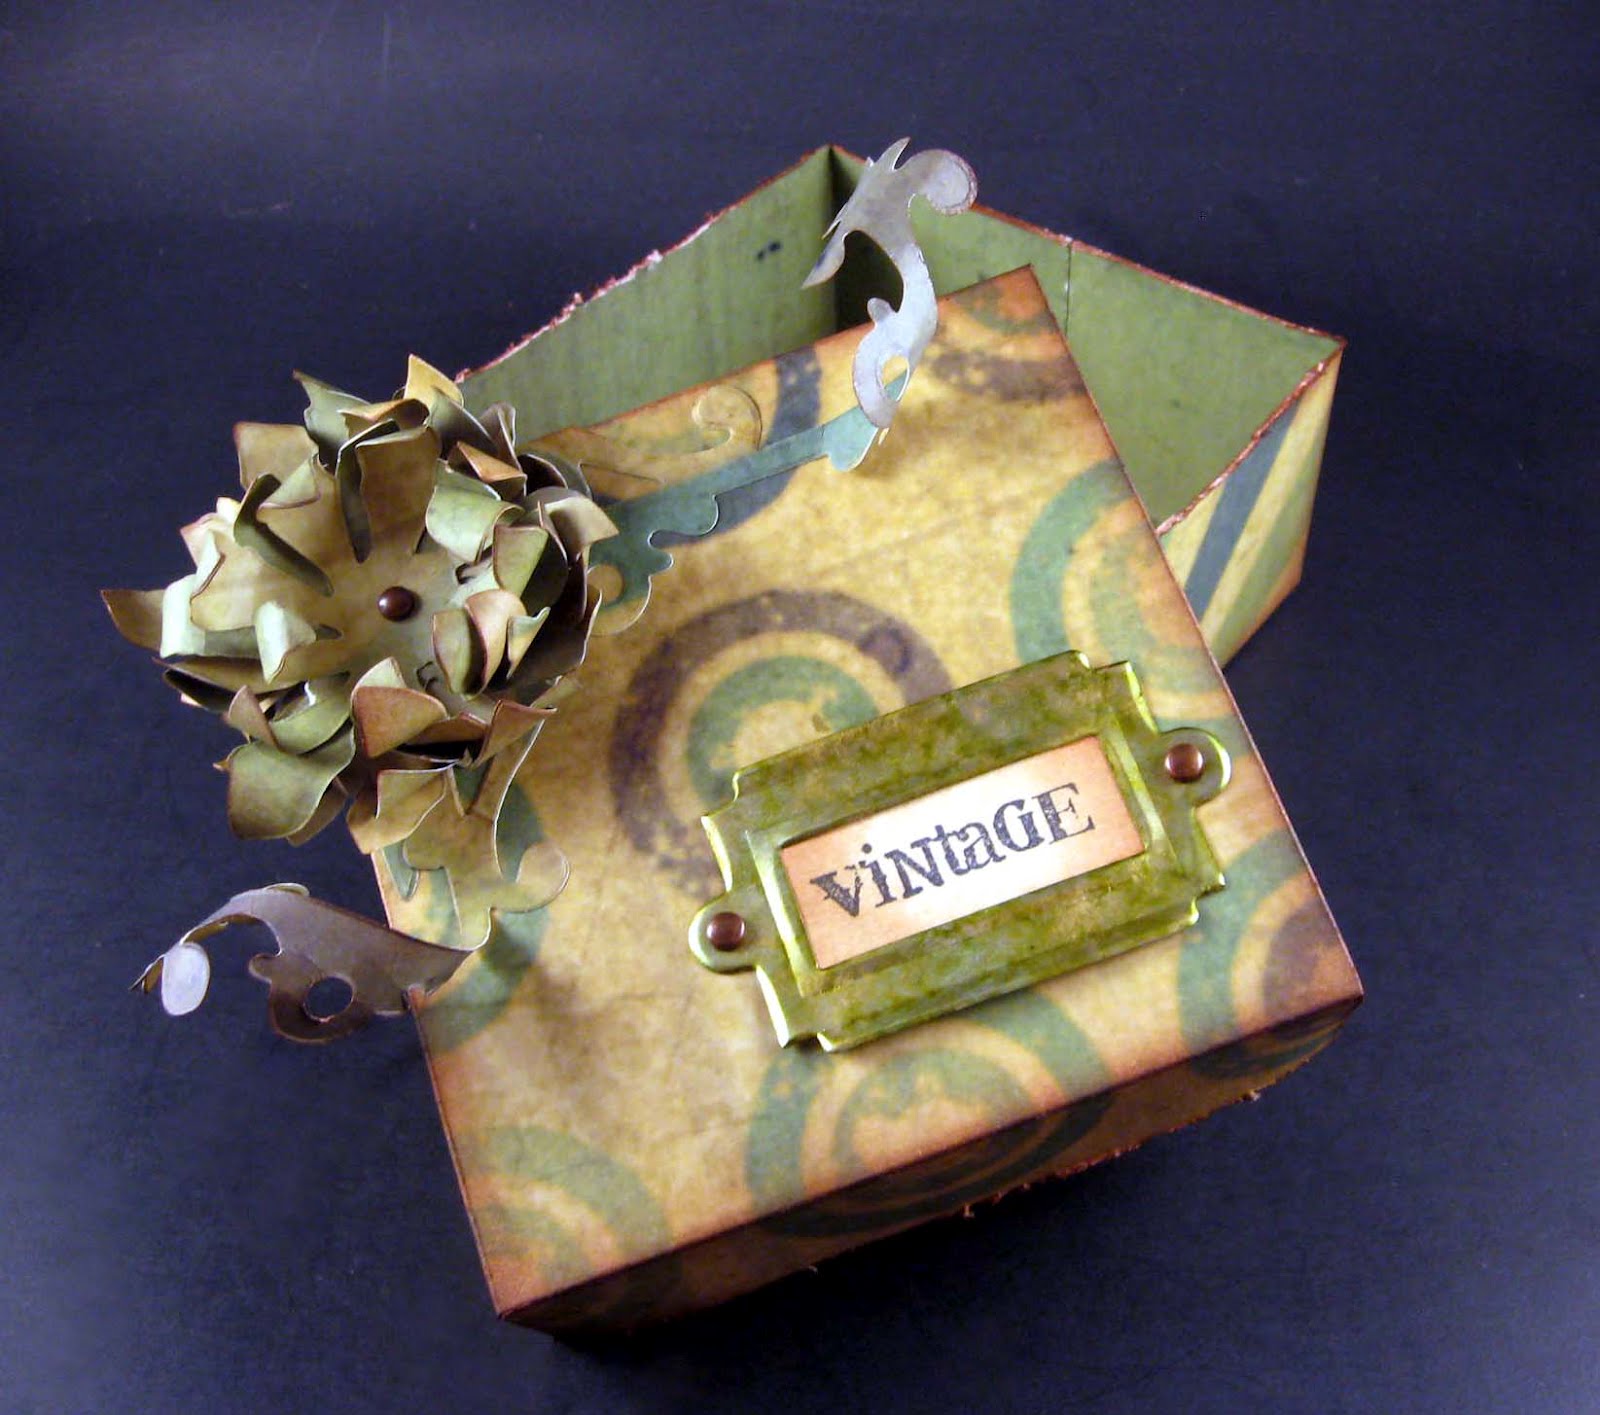 A few close-ups of the flower...
 I wanted the back petals to curve down to hug the side and corner of the box.
So there it is... my vintage treasures box inspired by this weeks Simon Says Stamp and Show blog challenge!
As always
Angela
Thursday, February 23, 2012
A Very Vintage ATC Series- ATC's 1-4
As some of you may know I am part of a Tim Holtz loving group that swaps through swapbot. I LOVE this group and the amazing ladies in it. I have been running a "Very Vintage ATC" series for the past few months (and will continue to do so as long as people are enjoying themselves!) and I wanted to share my first four creations with you. (For those of you who don't know- an ATC is an Artists Trading Card and has to be 2.5 inches x 3.5 inches in size).
The first swap in this series was titled, "A Very Vintage Christmas ATC." I created the following ATC by using a couple different graphics from The Graphics Fairy Blog- a fantastic site to find a vast array of vintage images. I cut out a second cape and placed it over the first one using dimensional adhesives to give this card more visual interest (the affect can't be fully appreciated in this particular photo).
 The second swap in this series was, "A Very Vintage Free Theme ATC." I had a lot of fun creating this and spent a lot of time with it as well (or at least more time than an ATC usually takes me) due to the multiple step process and drying times of certain elements. I used a real vintage book page as the background and collaged using cut-outs from the Conservatory stack by 7 Gypsies (which a lurve). I also used a few Tim Holtz products (like the file folder tab die and distress inks).
 For the third swap I of course went with a valentine theme- "A Very Vintage Valentine ATC." Again I used images from The Graphics Fairy Blog. In fact, the little boy and girl were two completely separate images, but they so obviously belonged together in my opinion. The girl was originally holding a bow which I cut out of her hand and placed the heart to make it look as if she was taking it from the little boy. The background is done with a variety of Tim's grunge stamps using distress inks and the words were printed off my computer.
 The most recent swap in this series was, "A Very Vintage Lady ATC" in celebration of March being National Women's History month. I covered my ATC base using a section of real sewing pattern which I then stamped on top of. I also stamped the women onto sticky back canvas and colored the dresses with distress inks. Once dry, I cut them out and placed them over the original stamped dresses. Again, the texture and dimension of this can only really be appreciated with the card in hand.

The first swap in this series was titled, "A Very Vintage Christmas ATC." I created the following ATC by using a couple different graphics from The Graphics Fairy Blog- a fantastic site to find a vast array of vintage images. I cut out a second cape and placed it over the first one using dimensional adhesives to give this card more visual interest (the affect can't be fully appreciated in this particular photo).
The second swap in this series was, "A Very Vintage Free Theme ATC." I had a lot of fun creating this and spent a lot of time with it as well (or at least more time than an ATC usually takes me) due to the multiple step process and drying times of certain elements. I used a real vintage book page as the background and collaged using cut-outs from the Conservatory stack by 7 Gypsies (which a lurve). I also used a few Tim Holtz products (like the file folder tab die and distress inks). For the third swap I of course went with a valentine theme- "A Very Vintage Valentine ATC." Again I used images from The Graphics Fairy Blog. In fact, the little boy and girl were two completely separate images, but they so obviously belonged together in my opinion. The girl was originally holding a bow which I cut out of her hand and placed the heart to make it look as if she was taking it from the little boy. The background is done with a variety of Tim's grunge stamps using distress inks and the words were printed off my computer.The most recent swap in this series was, "A Very Vintage Lady ATC" in celebration of March being National Women's History month. I covered my ATC base using a section of real sewing pattern which I then stamped on top of. I also stamped the women onto sticky back canvas and colored the dresses with distress inks. Once dry, I cut them out and placed them over the original stamped dresses. Again, the texture and dimension of this can only really be appreciated with the card in hand.
I had never even heard of ATC's until I joined swapbot, but now I thoroughly enjoy creating them... they are such a great way to expand your creativity and practice new techniques and styles while also fine-tuning the things you are already great at!
As always
Angela
If you have any questions on supplies used please feel free to ask! And you know I do love any and all comments!
Monday, February 20, 2012
Un Paris PAPILLON
I created this journal a few months ago, but was inspired by this weeks challenge at Simon Says Stamp and Show to finally get my rear in gear and share it! (Plus, I've never posted anything through Simon Says Stamp, but I've been wanting to for awhile). I think I've been a bit hesitant because I was unable to really capture the beautiful shimmer of this project and didn't feel the photographs did it proper justice. (If anyone has some tips on photographing shimmer/shine on projects, I would love to hear from you)! Anyway, the challenge was to "stamp and show" something "London, Paris or New York." So here it is... my Paris Butterfly Journal!
The front and back pages are very similar, but the front has the addition of the butterflies. I used two stamps- both from the Stampers Anonymous/Tim Holtz Papillon Set. I worked on Kraft paper which is probably my most favorite medium to work with at the moment. You can't really see it in the first two photos, but there is a gorgeous shimmer which I created using the Ranger Perfect Pearls Mists in Heirloom Gold and Turquoise.

 You can see some of the shimmer here, but not the intensity of the color- it especially looks beautiful over the black ink.
 I used plain black cardstock for the inside covers and again utilized the Perfect Pearls Mists to add this lovely shimmer and touch of color. It actually shows up pretty beautifully in this following photograph.
 The pages of the journal are also Kraft and I bound my project using my beloved BIA (Bind-It-All)! This is hands down my favorite handmade journal so far and I haven't decided yet whether I am going to allow myself to part with it or not. Yes... selfish, selfish, selfish! (grin)
 I hope you've enjoyed this project! If you have any questions about supplies used or comments, you know I always love to hear 'em!
As always
Angela
Sunday, February 19, 2012
Charmed! (Tim Holtz Inspired Purse Charms)
I recently had the pleasure of participating in a Tim Holtz inspired purse charm swap. I had never made purse charms before, but I find it fun to get away from paper-related crafting every now and then. For this swap we had to create two purse charms (one for each of our two partners). My favorite thing about these charms is that I ended up using elements which all came from different people through various other swaps I've done. The only part of these charms that I had previously purchased myself were the Tim Holtz clasps. The reason I ended up being so pleased with how these turned out is that even though all the elements were from different sources, they were all perfectly color coordinated!

I decided I wanted to create a special little presentation for my partners so I created petal boxes using some of my Tim Holtz card stock. I then wrapped some hemp around them with small name tags threaded through.
 I hope you've enjoyed this little project share! I've noticed I hold myself back from blogging because I feel like I should only post when I have some massive project or a tutorial, but that's just silly. I'm going to try to start just sharing what I do because it honestly is what I love!
As always
Angela
Of course... if you have any questions or comments- I would LOVE to hear them!!
Thursday, February 16, 2012
Altered Board Book: Love Theme
It has been awhile since I spent more than a few hours on any one particular project. Recently I joined a swap (through swapbot) where I had the opportunity to do just that... spend A LOT of time on one project. The swap was for altering a children's "chunky book" in a love theme. The experience was a little nerve-racking at first because I had a bunch of muddled ideas running through my head, but I couldn't get myself to commit to any one particular direction. I started with the cover first and once that was done the entire book just started coming together. So here it is... my very first Altered Board Book (Love Theme)!
I used Kraft card stock to cover all of the pages of the book before beginning. For the cover I utilized various stamps to create a lovely background. I then used Tim Holtz dies to create the flourish accents (that was from the Hanging Sign die) and the center bookplate (which I die cut from an aluminum can and colored with Ranger Alcohol Ink). I also created a closure with the Hardware die, grungeboard and a hitch fastener (an idea which I picked up from Tim Holtz). Other supplies used were gel pen, brads, E-6000, Rock Candy Crackle Paint, vellum paper with the word "love" and Distress Inks. The binding on the spine is Tissue Tape.
I used Kraft card stock to cover all of the pages of the book before beginning. For the cover I utilized various stamps to create a lovely background. I then used Tim Holtz dies to create the flourish accents (that was from the Hanging Sign die) and the center bookplate (which I die cut from an aluminum can and colored with Ranger Alcohol Ink). I also created a closure with the Hardware die, grungeboard and a hitch fastener (an idea which I picked up from Tim Holtz). Other supplies used were gel pen, brads, E-6000, Rock Candy Crackle Paint, vellum paper with the word "love" and Distress Inks. The binding on the spine is Tissue Tape.

Next up is pages one and two. These pages are a combined theme and I used the post card as a way of turning them into a cohesive unit. I wanted these pages to reflect vintage inspired love letters and postal themed elements. I created a small tear in the post card for visual interest. When adhering this card, I left a space that was not glued down so I could have a small pocket affect for a tag. The tag was created using bronze UTEE and a postal rubber stamp.


Page two contains an excerpt from a love letter between Robert Browning and Elizabeth Browning. I hand wrote this on a linen textured card stock that I then crinkled and rubbed Vintage Photo Distress Ink over. The seal was created using bronze UTEE and a wax seal. I also added a Tim Holtz pen nib to this page.


Page three was created with two La Blanche stamps and a Tim Holtz stamp then colored in with a variety of Distress Inks. I also removed two of the books pages and used tissue tape to fill in that gap which you can see between page three and four.

Page four was inspired by an ATC I recently created- it is essentially a larger scale version of the same design, but I loved it so much I had to use it for this book. The two adorable little valentine children came from The Graphics Fairy blog (if you love vintage images, you MUST check this site out). I printed the saying out on my computer and the background is comprised of various Tim Holtz "grunge" background stamps and Distress Inks. I also used Glossy Accents over the heart on the little girls pants.


The final pages are a combined theme just like page one and two. For these pages I used these mini paper bag style envelopes and inserts for excerpts from a book titled, This Is My Beloved by Walter Benton. The keys and key holes were die cut from the Tim Holtz/Sizzix Hardware die and given a coating of bronze UTEE. Again the background consists of Tim Holtz background stamps and Distress Inks.


Here is an example of the cards inside the envelopes... they are all hand written. I distressed the edges of each one using my Tonic/Tim Holtz paper distresser and then added Vintage Photo Distress Ink.

And finally, the back cover... I spritzed over the back with a shade of Glimmer Mist (Red Velvet) and also a shade of Perfect Pearls Mist (Heirloom Gold). You can also see the full grungeboard closure here.


And that's that! I'm not going to lie... I had a hard time letting this one go! I just hope the person who received it really loves looking at it as much as I loved making it. I guess that's all we can really ever hope for when we put our heart into something and give it away to someone else.
Well, I know this post was very "down to business" so to speak, but I wanted to be sure I shared as much detail as I could about what I used/did. However, if you have ANY questions at all- about products, techniques... anything- please feel free to leave a comment and I will do my best to answer!
As always
Angela
Wednesday, January 18, 2012
Grungy Scrap Flowers (Tutorial)
As many of you know I have a bit of a problem when it comes to craft supplies... I love to buy them and I love to hoard them. So, in an effort to get this little (uhm... more like big) problem under control I am making 2012 the year to use what I have! Aside from the small moments of panic when I think about not buying any non-essential craft supplies, this challenge has actually been really great for my creativity! I have found myself digging into supplies that were long ago forgotten, finding ways to utilize the massive pile of scrap paper I have and also trying to craft outside my usual comfort zone. I have been feeling more free to create and experiment and just have fun doing what I love to do!
This past week I tried to re-create some paper flowers I had seen in a magazine- the kind created by cutting a circle into a spiral and then wrapping it around itself. I wasn't very pleased with the result and decided that instead of frustrating myself, I would simply go in another direction. This is what I came up with...
 The great thing about these flowers is ALL the paper I used is from small scraps of Kraft paper that were- in my opinion- too big to throw away, but just too small to really use for anything else (did I mention I hoard?). I also had the chance to use a stamp I have never used before and I am super pleased with the result! I call these my little grungy scrap flowers. Here's a bit of a close-up...
 Want to make some yourself? You can! They are super easy (and only slightly time consuming depending on how many you make at one time). So what will you need?

This past week I tried to re-create some paper flowers I had seen in a magazine- the kind created by cutting a circle into a spiral and then wrapping it around itself. I wasn't very pleased with the result and decided that instead of frustrating myself, I would simply go in another direction. This is what I came up with...
The great thing about these flowers is ALL the paper I used is from small scraps of Kraft paper that were- in my opinion- too big to throw away, but just too small to really use for anything else (did I mention I hoard?). I also had the chance to use a stamp I have never used before and I am super pleased with the result! I call these my little grungy scrap flowers. Here's a bit of a close-up...Want to make some yourself? You can! They are super easy (and only slightly time consuming depending on how many you make at one time). So what will you need?Basic Supplies:
- Circle Punches in various sizes (I used my 1", 1 1/4", 1 3/8", 1 1/2")
- Love Definition stamp from the Tim Holtz/Visual Artistry clear stamp set Purely Random (or of course any stamp you prefer)
- Memento Ink
- Distress Ink (I used Victorian Velvet, but again, any color you prefer)
- Ink Blending Tool
- Tim Holtz/Tonic Paper Distresser
- Bone Folder
- Paper Piercer
- Craft Foam
- Mini Brads (mine are copper)
- Ranger Craft sheet to work on
- Kraft Scrap Paper
First you will want to punch your circles from the scrap paper then stamp them with your chosen image(s). Using your Paper Distresser, go around the outer edges of the circles. Once that is done, use your chosen Distress Ink around the edges... I love how much this simple step adds to the visual interest of these flowers! Now go ahead and use your bone folder to work over the surface of the circles. (Do this step on the craft foam- it's the perfect surface for this affect). You will want to use some substantial pressure to start the "warping" process... the outer edges will start to curl up. (Just be careful not to apply too much pressure as it will destroy your paper). Once you have all of your circles warped to your liking, layer them in size order (smallest on top to largest on bottom). Use your paper piercer to go through all the layers in the center and then add your brad... DONE! And now you have some gorgeous grungy flowers to use for any of your paper crafting projects. The great thing about these is you can use stamps to change the theme of your flowers to fit any project you'd like! One last suggestion... if you want to make a lot of these at one time do each step on all the circles as you work rather than completing one flower at a time. It really cuts down on the amount of time you will spend on this project!
I hope you enjoyed this tutorial and found it informative and easy to follow. Of course I'd be happy to answer ANY questions you may have and you know I love your comments!
As always
Angela
Monday, January 16, 2012
With Sympathy (A Card Share)
This past Friday the sweet lady who lived next door to us passed away. She always had a kind word for us and simply adored my daughters. She will truly be missed. I really wanted to create a card for her family that would really convey the beauty she brought to this world and the sadness of her being gone. Here is the finished card (the inside is also stamped with a sympathy sentiment)...


Supplies:
- Penny Black rubber stamp (Snow Dust)
- Ranger Archival Ink in Jet Black
- Spellbinder's Nestabilities dies
- Ranger Distress Ink in Victorian Velvet and Concord
- Ink Blending Tool
- Purple and White Cardstock
- Adhesive
As always
Angela
PS. Any questions or comments are indeed appreciated!
Subscribe to:
Posts (Atom)
