Saturday, December 24, 2011

DVD Gift Box Video Tutorial

I had so much fun making my video tutorial for Faux Wax Seals that I couldn't wait to do another one! I was inspired to create a tutorial for DVD sized gift boxes because members of my family usually have DVD's on their Christmas wish lists. I thought it would be nice to make my own boxes and then share the dimensions and steps with anyone else wanting to give it a try. You can watch the tutorial here, but before you do that here are the basic supplies you'll need:
  • 2 pieces of cardstock cut to 7.5" x 9.75"
  • Martha Stewart Scoring Board
  • Adhesive

I also used my Tonic/Tim Holtz paper distresser and then of course whatever you want to use as your embellishments to make your box uniquely yours!

Here is a look at a couple of my finished boxes... I got to use my fabulous new La Blanche Santa stamps and some good ol' distress inks for these. I also added a dash of Glimmer Mists and Perfect Pearls Mists to finish them off.

I hope you enjoy the tutorial. Perhaps I should warn you- this tutorial runs close to 18 minutes long, but you can take what you want and leave the rest! Have a beautiful Christmas and a fantastic holiday!

As always

Angela

PS. As always, your comments and questions are always welcome here!

Monday, December 12, 2011

Faux Wax Seals (My First Video Tutorial)

Hey everyone! Thanks for stopping in... I am super excited about what I have to share today because it's my first video tutorial ever! I was messing around last night, just having fun creating with no purpose, and I thought I'd go ahead and share a tutorial for what I came up with. Here's a little peek at what I made... faux wax seals!


Aren't they just so lovely? Yup! Here's a list of supplies you'll need for this technique:
  • Ultra Thick Embossing Enamel
  • Embossing Ink (I used my VersaMark pad, but any will do I'm sure).
  • Heat Tool
  • Craft Tweezers
  • Wax Seal or Rubber Stamp
  • One Inch Circle Punch
  • Scrap Paper
  • Non Stick Craft Sheet (I suppose this is optional, but it really makes a great work surface for this technique).

So there you have it... gather up the goods and join in the fun! Just a fair warning- these are super easy and super fun to make (and yes, super addictive)!

Check the video out here and let me know what you think!

As always

Angela

Wednesday, December 7, 2011

Christmas Card and Gift Box Sets

I've noticed that I'm often so focused on creating items for my online store or completing special orders for people I know that I don't always make time to actually make and give out my own handmade items to the people I am closest to. Can anyone else relate? Long story short, my oldest daughter attends preschool so I wanted to create something special to go with the gifts they are given. Basically, all the parents put in a certain amount of money and gift cards are purchased for each of the two teachers. I volunteered to make cards, but then I also got the idea to make coordinating gift boxes for the cards to be nestled in. Here's what I came up with...

This is a full view of one of the cards (both cards are essentially the same) with a handmade envelope...


Here is the card with the gift box...

Here is a close up of the Santa. I created this part of the card by stamping the Santa from the Tim Holtz Letters To Santa stamp set onto a cream cardstock. I then colored him in using various Distress Inks in Fired Brick, Peeled Paint, Antique Linen and Spun Sugar (for the rosy cheeks and nose). After die cutting with my Spellbinders oval Nestabilities die I used Old Paper and Vintage Photo Distress Inks around the edges of the image. I used the next size up oval die for the deep red paper beneath, adhering the Santa image with dimensional adhesives.
I used the script stamp from the same Letters To Santa set to add a very subtle detail to the green paper. The rhinestones on the bottom were originally clear-- I used Cranberry alcohol ink (from Ranger, Inc) to coordinate them with the deep red paper. I also distressed the edges of the card base, the green paper and the red oval. For the red and green papers I added Vintage Photo Distress Ink to the edges.
Here are the two boxes I created to coordinate with the cards. I created these using my Martha Stewart Scoring Board and 4 sheets of 8x8 paper. I distressed the box edges using my Tim Holtz Paper Distresser (by Tonic) and added some more of that good ol' Vintage Photo Distress Ink. To the tops of the boxes I added some lurvely rosettes which I made using my brand new (to me, that is... just got it this past week!) Tim Holtz Paper Rosette die. (Can you tell yet that I LOVE me some Tim Holtz)? I cut the green circles with my 1 1/4" circle punch and then added more alcohol inked rhinestones to the top.
To add a little something extra special, I used real vintage book pages for the inside of these boxes. (I really hope I don't offend the recipients... they are teachers after all). After tearing my pages out I used my Paper Crimper to add some texture and then an office supply paper shredder (it was in the basement when we moved in-- woo hoo!) to cut the pages.
So there you have it... I finally made something for someone I know! But seriously, I hope you've enjoyed looking at these and I also hope I wasn't too long winded in my explanations. Would love to hear your feedback! Also, if you have any questions about anything I did or used to create these, please feel free to ask!
As always
Angela
PS. All paper used is from the Naughty or Nice stack by Recollections which is the Michael's brand (and I must say... it is GORGEOUS).

Monday, December 5, 2011

My First Haul Video!

Ok, I will admit I am a bit of an online craft supply shopping addict (or really, just a craft supply addict in general). One of my go-to sites for papercrafting supplies is EllenHutson. They are great for all the things I can't get at JoAnn's online store. I have bought all my Stamper's Anonymous Tim Holtz stamp sets from them and a lot of other TH goodies (like his stamp binder for all my SA sets). I also have gotten different 7 Gypsies and Graphic 45 items just to name a couple of brands. Anyway, I went a little hog wild with their recent Black Friday sale. I decided to try making my first haul video and since it didn't turn out too horrible, I'm going to go ahead and share it! If you are anything like me, you get a vicarious thrill out of seeing other people's craft supply scores. I know... it's a sickness.

So check it out here and let me know what you think!

As always
Angela

Tuesday, November 8, 2011

Where Have I Been This Time?

Ok, once again I have been MIC (missing in crafting). So what have I been up to this time? Preparing for my first craft show! It was my goal to be in at least one craft show this year so I jumped at the first one I saw calling for crafters. I then spent the next two and a half months preparing inventory for the event. I cranked out as many picture frames, journals, sketch books, magnets, holiday planners, mini wire bound notebooks and gift tags as I could and I have to admit-- I was rather pleased with myself! Soooo, the day of the craf tshow arrives and guess what! BLIZZARD CONDITIONS! Yes, about an hour into the start of the show it started coming down and after a few hours had gone by people just stopped showing up. It was a real bummer. I did however manage to make enough sales to go a little above the cost to be in the show so I felt satisfied with what I had accomplished. Now on to the fun part... pictures!
Here I am all super excited and proud of myself (and a little hyped up on one of those 5 hour energy drinks). You can see behind me the calm before the storm... (However, I loved that spot because it really was beautiful to watch the snow falling). I wanted to go for a vintage inspired set up and I really liked how it all turned out.
Next up is a view of my journal and sketchbook display. The books on top are actual vintage books I thought would look great as display props.
Here you can see my fall inspired frames. These are probably my favorite frames of all the ones I made simply because I find them so stunning and richly colored.
Next is a view of my vintage inspired frames and my bottlecap magnets (also vintage inspired). The night before the show I was freaking out about how to display my magnets and then I had this idea... to use this old wooden chessboard. People seemed to really like the idea!
Below are the baskets I used to display my gift tags, mini notebooks and holiday planners. You can also see a few Halloween themed frames behind them.

All in all I accomplished my goal and I was very proud of myself. I am looking forward to next year now that I won't have any fear of the unknown feeding on my creative energy. Oh, and next time... I will definitely be preparing more then two months in advance. *GRIN*
As always
Angela

Tuesday, August 2, 2011

A Word About Customer Service

Aside from having great products, the most important aspect of any business is superb customer service. This is especially true of the small, independent arts/crafts based business. People want a personal experience and they want that experience to be a pleasant one! Nobody wants to feel ignored if they express a concern about a purchase. Nobody wants to feel ripped off by shipping prices. People know when they're being over charged. It's one thing to charge a little extra to cover shipping supplies and gas prices for the trip to the post office, but in my opinion, anything over a dollar above the shipping price is just taking advantage. One of my own shipping policies states that any difference of more than a dollar above the shipping cost will be refunded. As Always Angela believes in combining honest business practices with outstanding customer service. I also like to communicate with my customers... letting them know I've received their order and also keeping them updated on when I have shipped their order. People like to know what's going on! And in the spirit of great customer service, if their is ever an issue with anything someone purchases from me, I will do everything I can to make things right. I want to be someone people feel comfortable purchasing from-- not just once, but over and over again!

Now that I've shared some of my basic thoughts on customer service I want to give a mention to someone I recently dealt with who I think exemplifies fantastic customer service. When I recently decided to purchase my Zutter products I found this etsy shop and purchased the Bind It All and wire cutters. I then made another purchase of the DreamKuts, the Zutter Kutter and the Round It All. When my order arrived my Round It All was damaged and defective. I contacted the seller and she immediately set out to make things right. She had me send the item back, but she reimbursed me the shipping cost. When my new Round It All arrived she had included the little pouch for free! Also, the listing for the Bind It All said the Bind It All Around the World book would be included as a free gift, but it didn't come with my BIA. When I contacted her about this she apologised-- it had been an offer for the previous month and she had forgotten to take it out of her listing. However, she made good on the offer and sent it along with the new RIA. Let me tell you... it seemed like something was always happening, but every time an issue came up, she went out of her way to make things right! To me, that is customer service at its best. It would have been so easy to have a negative experience in this situation, but because the seller was always willing to make things right and was also always on top of communicating with me, I ended up having a pleasant experience and a very high opinion of her as a seller. (Thanks, Niki)!
As always
Angela

Monday, August 1, 2011

Two For One Card Share

I couldn't even tell you how long it has been since I've made a card before a couple days ago! Thanks to a friends special request for some flower themed birthday cards I found myself happily creating these two lovelies...

For the first card my friend wanted me to make something with scenery and gardens for a friend who loves to garden, but currently lives somewhere which makes that impossible at the moment. The inspiration for this came immediately. I just recently learned how to make these fabulous little organza flowers so I thought they would make the perfect garden. The card base is from one of Tim Holtz's delicious paper stashes. I printed the sentiment out on translucent paper using my computer. I wanted something that would allow the beauty of the paper to come through while still allowing the organza flowers to be the center of attention.


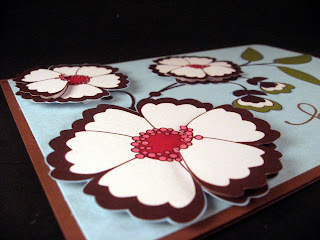
For this next one, the only specification was that it be a flower themed birthday card. So of course I took the liberty to use one of my favorite techniques along with my favorite paper for this particular technique (basically any gorgeous, large print patterned paper by AC Paper)! I also only rounded two of the corners-- ones opposite each other to add visual interest. I saw this on a couple cards in PaperCrafts magazine and I thought it really added something special!
I just LURVE all the dimension you get from this technique...
Well, there you have it! A lovely little two-for-one Monday special. Feel free to share what your favorite paper crafting technique is! (Now off to fondle my Bind It All some more... we've been spending a lot of time together and I'm pretty sure it's love)!
As always
Angela

Saturday, July 16, 2011

Fun With My New Distrezz It All

Today has been a GREAT day! Why? Because this morning Mr. FedEx arrived with my recent amazon.com order which included my new Distrezz It All and my one inch Antique Brass owires. Fifteen minutes later Mr. UPS arrived with my recent joann.com order which was loaded with chipboard, 7 Gypsies book boards and some round paper punches (I wanted better nesting options for various projects)! So yes... a wonderful day indeed! And of course I was ready to get playing with my new "toy"... I had already cut my paper to the right size for my new book boards so I whipped out my new distrezzer and.... HOLY TOLEDO!! That thing has some serious kick! I about had a heart attack with the way that thing grabbed onto my first set of papers. After that though, it was super easy and I am soooooo, soooooo deeply in love with it!! So here's my first project utilizing the Distrezz It All, a long with the Bind It All and my new 7 Gypsies book boards... Enjoy!


I filled the book with 30 pages of Kraft card stock. Doesn't it just look so lush and wonderful?

I really love the character the Distrezz It All adds. It really pulls together the vintage inspired aesthetic. Plus, it distresses at a rapid speed. I couldn't believe how quickly I finished this project. So yeah... I am in love with Zutter products... the soul mate kind of love.
As always
Angela

Friday, July 15, 2011

Where The Magic Happens...

I absolutely love taking a peek into other people's crafty spaces. Too fun! So now I'm going to give a little peek into my own... I have pretty much taken over most of part of one of our home's common rooms as the place for all my crafting-- where the magic happens! Lately the magic has been getting less magical as things have become cluttered and crowded. I recently went through all my lovely supplies (can you say hoarder!?) and put things I no longer needed or wanted into a yard sale. Luckily, pretty much all of it sold right away! I decided to use my earnings on a couple new crafting items...the Zutter Kutter, the DreamKuts, and the Distrezz It All. Soooo... of course with all of these magnificent items on the way I REALLY needed to do some cleaning and de-cluttering. I decided to go ahead and get that done tonight since my orders should be rolling in sometime next week!
So here's the before...

And now the lovely after...
My lovely work surface... (If you look closely you can see my new paper trimmer! I decided to upgrade now that I'm going to be making a lot of books and journals. I wanted to be able to cut at least 6 inches without having to pull out the measurement arm).
This is where my photographic magic happens... in my little home made light box! This is an entertainment center I have completely re-purposed for my craft storage needs.
The whole she-bang...

Thanks for checking things out-- I look forward to sharing many up-coming projects with you as I settle into my newly cleaned and organized work space!

As always

Angela


Have Bind-It-All... Will Create!

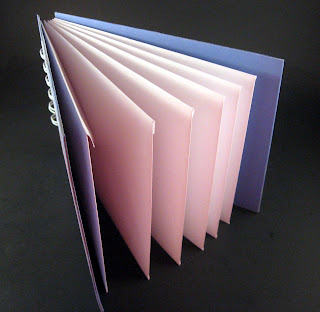
I finally received my Bind It All order in the mail! (I hate waiting for online orders... bleh). It came yesterday and I was so excited to rip into, but once I had it open I sort of had a creative freeze. For the past couple of weeks all I've been able to do is think of ALLLL the amazing things I would make with my BIA, but there it was- right in my hands- and I was terrified! All I could think of was messing up everything I tried to make. My BIA sat on my work surface all day long... garnering passing glances from me. I felt we were sort of sizing eachother up. By the time my evening freedom (known as putting the kids to bed) rolled around I was ready to give show my BIA who's boss. So here it is... my very first BIA project! And wonder of all wonders... I didn't mess up a single time! Perhaps it was a case of beginners luck, but I'm not here to split hairs.
I created this to be an Envelope Ephemera Book (for holding ephemera and various paper bits) for someone on swapbot who is currently organzing her craft space. The cover image is what I am most proud of because she likes images of animals holding umbrellas and I had this from a card I had received and just cut off the front to use on something in the future. I knew it would be perfect for her!

The only thing I wasn't 100% pleased with was my binding job... it was just ever-so-slightly wonky. I'm sure it's just a matter of practicing!
I placed a total of 6 envelopes inside. I figured that would be enough space for breaking down ephemera into cattegories if she wants.


So there you have it! I don't mean to toot my own horn (ok, yes I do...), but I'm really happy with how it turned out. I hope it will make the recipient very happy!
As always
Angela

Monday, July 11, 2011

Where, Oh Where Have I Been?

I've been a little MIA lately... not just on my blog, but my etsy shop as well. So where have I been and what have I been up to? Well, I've been down the crafting rabbit hole. Let me explain... I am part of an online community called Swap Bot. This is a forum for joining in on public or private swaps with people from all over the world (or just your own region if you prefer) for almost ANYTHING your heart desires to swap. A few months ago an incredible group was started called the Tim Holtz Addicts group which I was invited to become a member of and was then made an officer. I was in craft heaven! As a lover of the Tim Holtz aesthetic I had finally found my "home" and proceeded to host and join in on many swaps. Since then most of my crafting time has been consumed with creating items for these swaps. I am also now a co-founder of the group which has been great! Needless to say my etsy shop and my blog naturally fell to the way-side. Hopefully I will be able to get back into the swing of things. As a start, let me share some of the things I have made in the past couple months for various swaps. And believe me, this is just a very small sampling. Ok, enough of my chit chat (or should I call it "type tap"?).

This is a charm bracelet I created for a swap I hosted. It now has a loving home in Switzerland!
These guys are images from the Tim Holtz Steampunk stamp set from Stampers Anonymous. I used them to create these little bottle cap magnets.
And here they are again (can you tell I love this stamp?)! These were made for a Tim Holtz Fragments swap.
This tag is made from all recycled materials and the use of Distress Inks and alcohol inks (both from Ranger). The wing of the bird moves!
Here is my second matchbox (which is also now in Switzerland with the same proud owner of the charm bracelet). I had sooo much fun making this and finding all the tiny elements for the inside. These are addictive to make!

Well, like I said-- that is just a small sampling of what I have been up to. You can view so much more on my Flickr Photostream. I hope you'll be inspired to fall down your own crafting rabbit hole!
As always
Angela

Saturday, April 2, 2011

Less Is More Challenge Week 9: A Touch of Red (Color Challenge)

I was so happy when I saw this weeks Less Is More challenge! This week we have been presented with a color challenge: A Touch of Red. I immediately knew what I was going to do and proceeded to complete this card in about five minutes. I LOVE it when that happens... when inspiration hits and everything you pictured in your head comes together even more beautifully than you had imagined! So here it is...

I was thrilled to finally use a technique I saw a long time ago in a magazine... one where you cut out parts of the same image and then adhere them together using dimensional adhesives. The article I read used stamps, but I chose to use this gorgeous flower from a piece of AC Patterned Paper (the a la Carte stack). I simply cut out one entire flower then cut out half of another one just like it. They are stacked with dimensional adhesives between them. I am also happy because I got to use one of my new Hero Arts sets for the sentiment (the Made With Love set-CL491). This has got to be one of my favorite submissions so far!


Thanks for letting me share! I am hoping to revisit this weeks challenge at least one more time. My brain is still whirring with ideas!


As always


Angela

Thursday, March 31, 2011

Variations On A Theme

Lately I have been working on creating a bunch of butterfly themed cards for a women's group I am part of. Our little "motto" is "Find your wings and keep them." These cards are going to be used for each woman to send a note of encouragement to someone they think needs to be uplifted throughout the week. Here are a few of the cards I finished today using some of the Copic colored butterflies I shared with you yesterday... This first card was created using the Divine Swirls embossing folder from Cuttlebug. I dotted each swirl tip with white gel pen. I also used the white gel pen for accenting the butterflies and hand writing the sentiment.

The following card was also created using the Divine Swirls embossing folder. The ends of these swirls were also dotted using a white gel pen. The butterflies were accented using Lavender Stickles (this was my first time trying Stickles... let's just say I'm in LOVE). The sentiment is hand written in white gel pen.


This next card was created using the Stylized Flowers embossing folder from Cuttlebug and sanding the raised parts. The butterflies were accented with Liquid Pearls in Rouge.


All butterflies are from the Antique Engravings set from Hero Arts (CL383) and are colored using Copic markers (for information on exact markers used, please visit yesterday's post. Thanks for letting me share!


As always


Angela

Wednesday, March 30, 2011

Butterflies, Copics and Scissors... Oh, My! (Again)

This is something I like to do when I'm doing craft time with my precious little 2 1/2 year old daughter... I stamp a bunch of images and then color them with Copics while she paints. Not only is it fun and relaxing, it's also a great way to prep a lot of images for future use. I just got this great stamp set with my Hero Arts order a couple days ago. It's called Antique Engravings (CL383) and I LOVE it! These butterflies are so great. The inspiration for these came from this youtube video by Jennifer McGuire. Here they are all cut out... I just love how vivid they are! Here are the Copic colors I used:

  • Purple butterfly: V12, V15

  • Gray butterfly: W-3, B63

  • Red butterfly: R22, R35

  • Yellow butterfly:Y17, YR68

  • Butterfly body: E57
And here is a card I created this evening using one of the gray butterflies...

I embossed a lovely gray textured card stock from my Neutrals Mat Stack (DCWV) with the Divine Swirls embossing folder from Cuttlebug. I then used sand paper to distress the raised areas of the embossed paper. I heat embossed the butterfly with three layers of Clear Ultra Thick Embossing Enamel (and VersaMark) to create a gorgeous glossy butterfly! Before the butterfly cooled too much I bent the wings up slightly to give a nice dimensional affect.