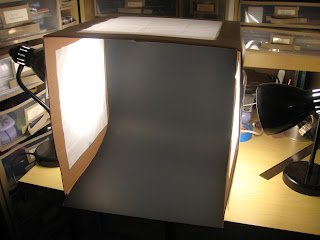
- cardboard box (large enough for whatever you are photographing... mine measures 14x14x16 inches)
- white tissue paper
- at least 2 lamps with bulbs (get bulbs that are crisp white light... not the basic bulbs that give off a yellow tint
- tape (I used painters tape)
- box cutter
- ruler
- black or white poster board (I got both to use depending on the color of what I am photographing)
First, assemble the box by taping the bottom. Cut off the remaining flaps (that would normally be used to secure the top). Measure 2 inches in from the sides for the top of your box and 2 of the sides. Draw lines to connect these measurements and cut out the centers with your box cutter.

Cut a long these lines with your box cutter to create 3 square openings- one in the top and 2 on the sides.
Cut the poster board to the width of the box and mount it inside. It should curve down and out- not be made to fit in the bottom back corner of the box. This creates the seamless effect of the background in your photos.

Layer 1-2 sheets of tissue paper over each opening (or however many you need to create the desired lighting effect). Position a lamp on each side (I use desk lamps with positionable necks). I only have lamps on the two sides which has worked fine for me, but you could also position a lamp to shine through the top if you fend that works best for you.

Voila! You are ready to take magnificent photographs! You may still need to do a little light balance editing in photo shop, but you will be amazed at the quality of your photos. Things I was never able to photograph well before turn out spectacularly!
If you found this useful, let me know! I love hearing from you guys!
As always
Angela


Getting a better photographing station was on my to do list today. I'm totally going to make one of these boxes. Thanks for sharing.
ReplyDeleteI forgot to mention that all the supplies I had to buy (box, bulbs-I bought Halogen ones, and tissue paper all cost less than 10 bucks and the majority of that was the bulbs! I got all the supplies at WalMart.
ReplyDeleteI've just followed you -saw you had signed up for "followers" on sb [I am blackbird 4] and i am tring to get followers myself.Thanks for the tutorial on the light box i'm going crazy tring to get good photos in bad daylight,so I'll try this tomorrow. Sorry I missed you're giveaway.
ReplyDeletehttp;//www.patriciasfabricart.blogspot.com